How to Perform Basic Electricity Experiments at Home: Step-by-Step Guide for Kids

Learning fundamental science concepts through textbooks often feels abstract and difficult for young minds to grasp. Children frequently struggle to visualise how electrical currents flow, why circuits break, or how switches operate in daily life. Engaging in practical electricity experiments at home bridges this gap, transforming complex physics into interactive, memorable experiences.
This comprehensive article provides step-by-step instructions, essential safety guidelines, and fun project ideas to help students master basic circuits safely and confidently.
Overview of Electricity Experiments at Home
Electricity Experiments kits help children understand basic electrical concepts through simple and practical activities. Instead of only reading about circuits, students can build small setups using batteries, wires, LEDs, and switches. These experiments show how current flows through a closed circuit and why a light turns off when the circuit is broken.
Simple activities such as testing conductors and insulators, making series and parallel circuits, and creating paper circuits also improve problem-solving skills. Children can observe results, find mistakes, and learn how everyday electrical devices work. With low-voltage batteries and proper adult supervision, Electricity Experiments can make STEM learning safe, fun, and easy to understand.
Features of the Electricity Experiments at Home Kit
Make learning more fun with hands-on activities that introduce children to electricity, circuits, and basic electronics. Designed for kids aged 8+, this activity kit combines practical learning with fun projects to build creativity, problem-solving skills, and interest in STEM.
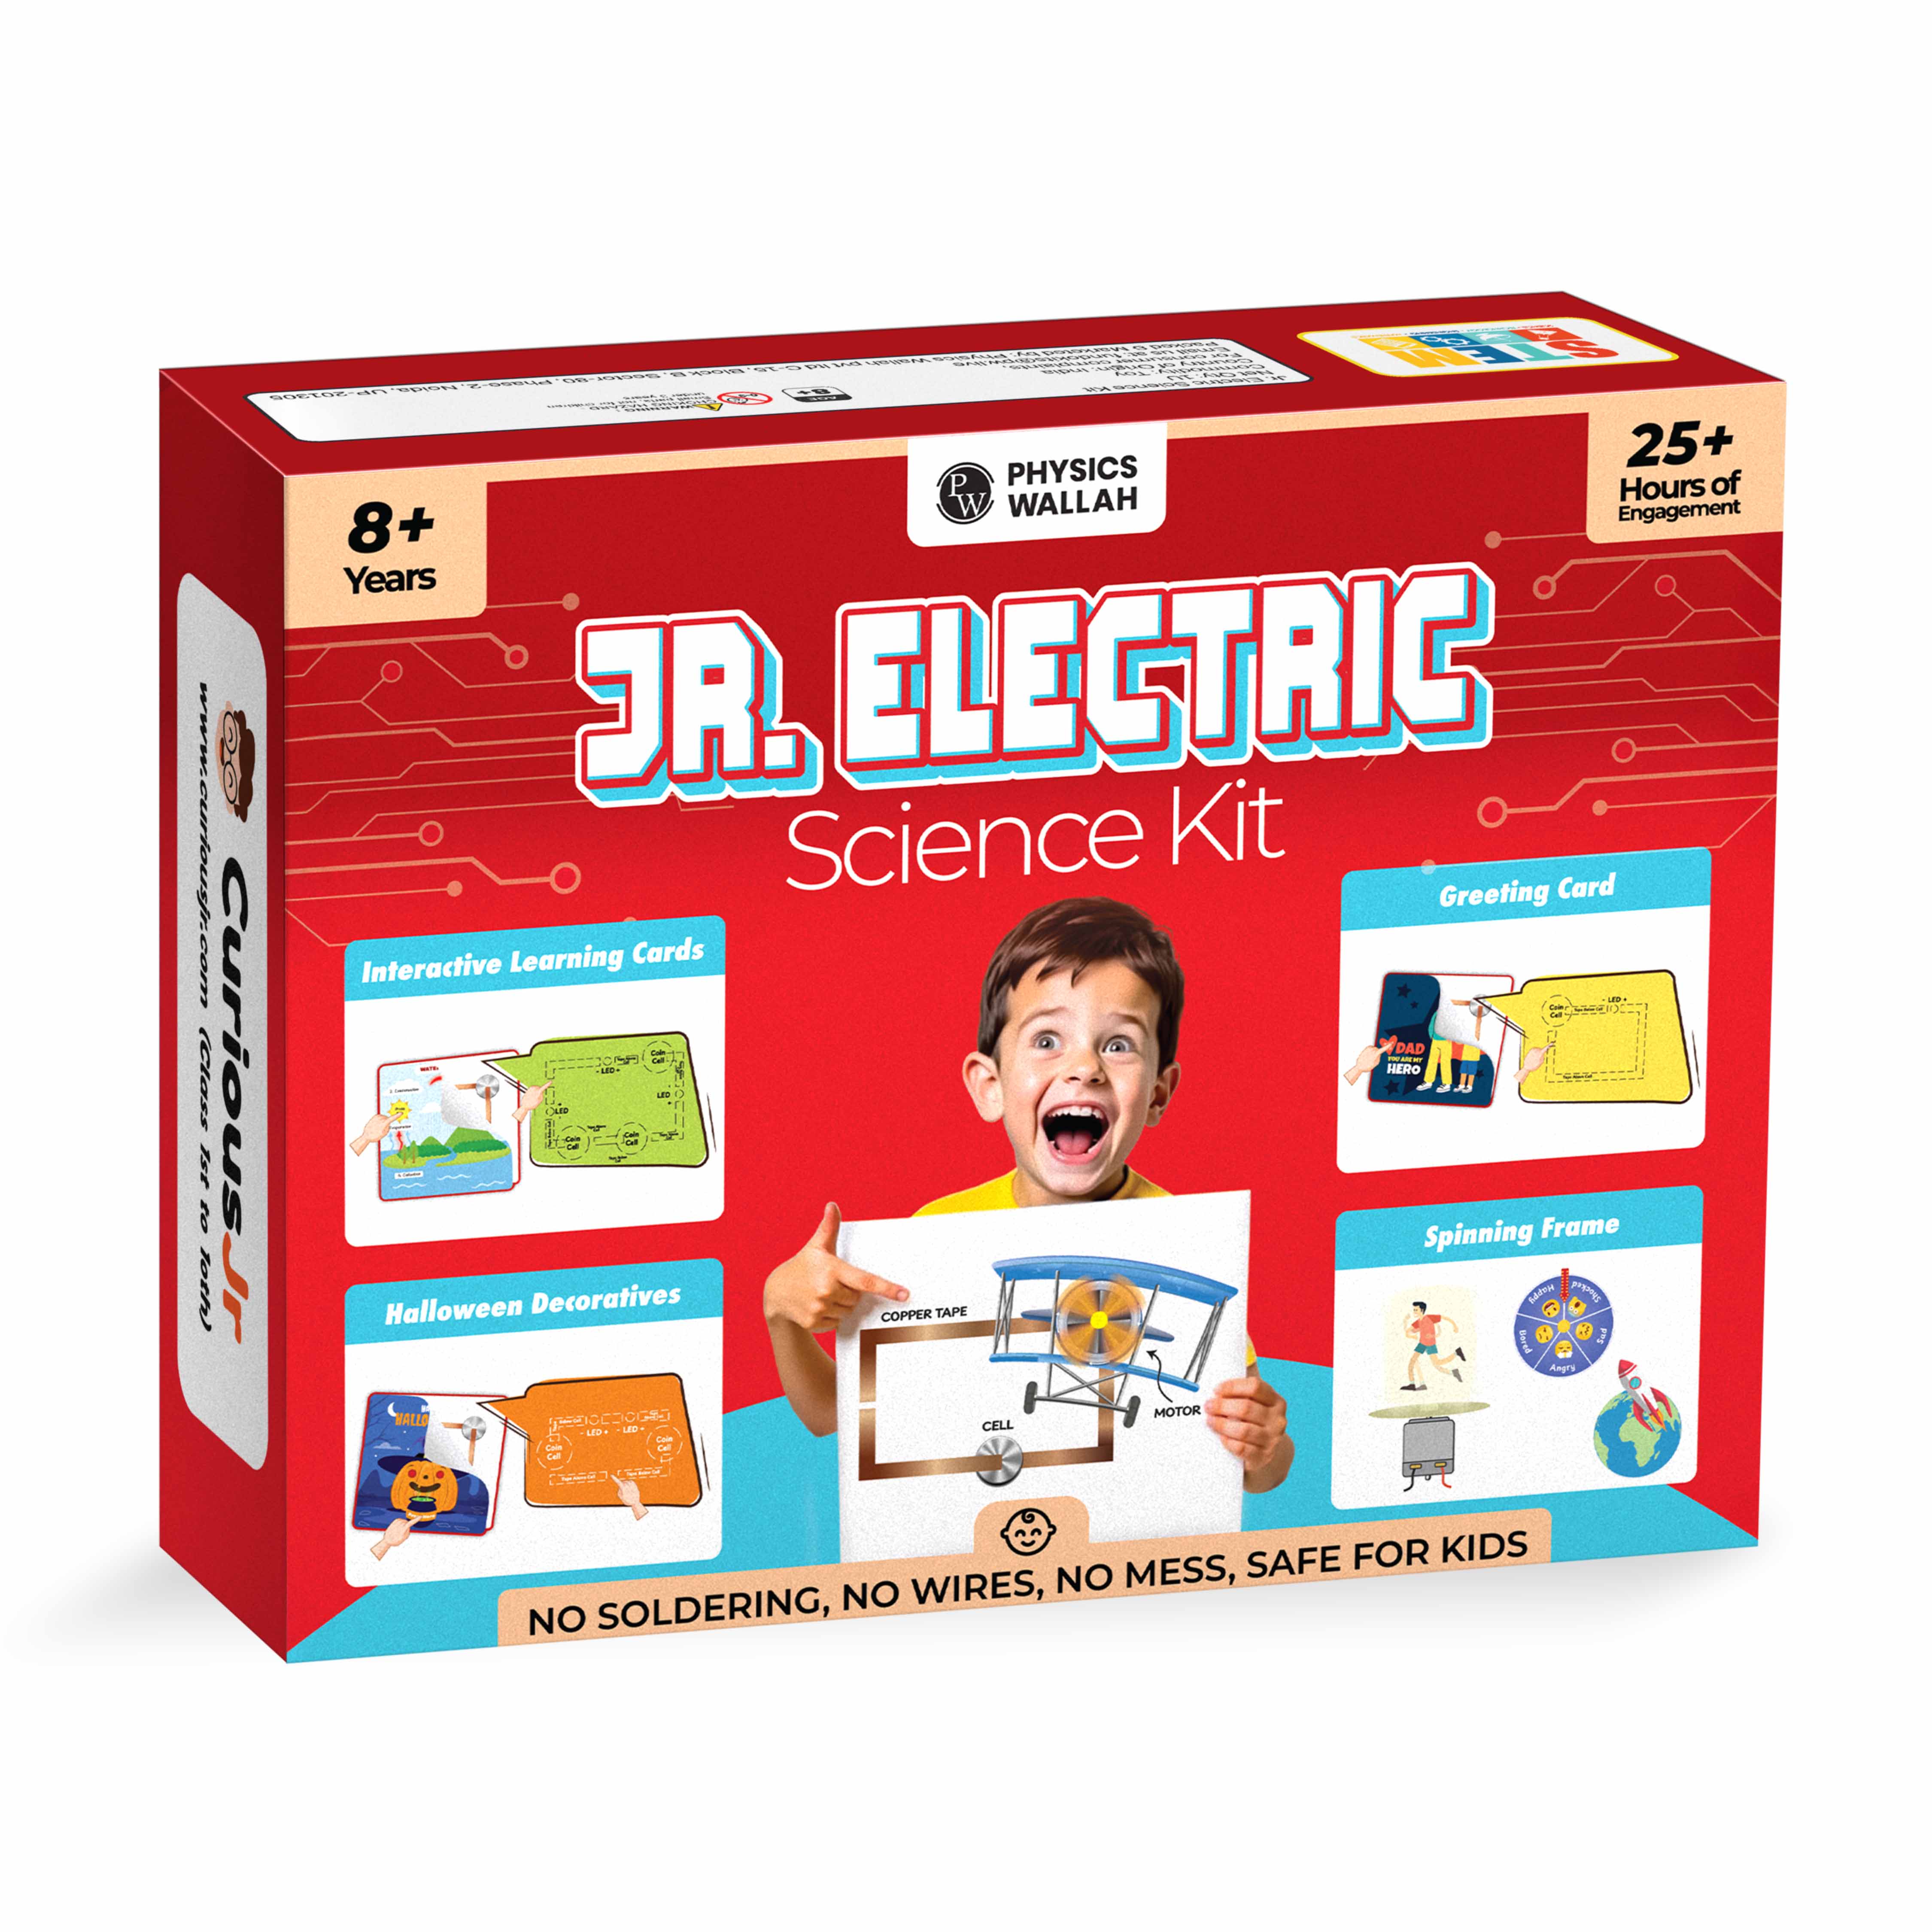
20 Exciting Activities: Learn basic electricity concepts through 20 fun activities, including interactive learning cards, spinning frames, greeting cards, Halloween decorations, and circuit-based projects. Children can explore different activities without complicated wiring.
STEM-Focused Learning: Encourage critical thinking, creativity, innovation, problem-solving, and practical learning through hands-on activities. Children can learn by building, testing, and exploring different ideas.
Step-by-Step Instructions: Follow an easy guide with clear instructions and colourful illustrations. The simple steps help children understand each activity and complete projects with confidence.
Safe & Non-Toxic Components: Use child-friendly and durable materials designed to provide a safe and comfortable learning experience while children explore basic electrical concepts.
Perfect for School & Home Learning: Use the activities for STEM projects, science activities, DIY crafts, greeting card making, school assignments, and hands-on learning at home or in the classroom.
Portable & Engaging: Keep children busy during weekends, holidays, rainy days, travel, or quiet play time. The activities encourage curiosity and creative thinking without relying on screens.
Build Real Electrical Projects: Introduce children to basic electric circuits, electrical connections, electronics, and practical STEM applications through simple projects and hands-on activities.
Perfect Gift for Kids: A useful birthday gift, holiday gift, STEM gift, science kit, educational toy, or activity kit for boys and girls who enjoy building, creating, and experimenting.
Learn Through Play: Help children explore Electricity, Electronics, Engineering, and STEM Learning while developing creativity, problem-solving, and other useful skills through fun, screen-free activities.
Why Do Electricity Experiments at Home for Kids?
Interactive learning remains one of the most effective ways to foster curiosity in young students. When children physically connect wires, light up LEDs, and test different materials, theoretical science instantly turns into tangible knowledge. Conducting electricity experiments kits for kids offers several distinct learning benefits:
-
Enhances Problem-Solving Abilities: When an LED does not light up, students learn to systematically troubleshoot connections, test power supplies, and check component polarity.
-
Encourages Screen-Free STEM Engagement: Hands-on science projects offer an absorbing alternative to digital entertainment while developing practical engineering skills.
-
Strengthens Spatial and Fine Motor Skills: Manipulating small jumper wires, battery holders, and switches improves hand-eye coordination and spatial reasoning.
-
Demystifies Everyday Technology: Understanding simple circuits helps children appreciate how household lights, appliances, and electronic devices operate.
Practical activity builds confidence. Rather than memorising definitions of conductors or voltage, young learners observe these concepts directly, creating a strong foundation for future school science courses.
Important Supplies for Electricity Experiments at Home
Gathering the right materials before beginning ensures a smooth and rewarding learning session. Most simple electricity experiments require inexpensive, easily accessible items or dedicated educational kits.
Basic Household and Hardware Items
-
AA or AAA Battery Holder: Holds cells securely and provides red (positive) and black (negative) lead wires.
-
Low-Voltage Light Bulbs or LEDs: 3V light-emitting diodes (LEDs) work exceptionally well for small battery setups.
-
Insulated Connecting Wires: Jumper cables with alligator clips make connections quick and solder-free.
-
Copper Foil Tape: Ideal for creating paper-based flat circuits for art and craft projects.
-
Small Slide or Push Switch: Allows children to control current flow manually.
-
Test Materials: Paperclips, wooden ice-pop sticks, aluminium foil, plastic rulers, graphite pencils, and rubber bands.
Dedicated Educational Kits
While collecting individual parts works well, using structured educational tools often simplifies the process. For instance, the Electric Science Kit includes pre-tested, child-safe components and over 20 guided activities. This activity kit removes the hassle of sourcing individual components and ensures all parts operate safely together.
How to Do Electricity Experiments at Home?
Follow these clear, step-by-step projects to conduct basic electricity experiments at home. Each activity explores a fundamental principle of electrical engineering in a clear, accessible manner.
Project 1: Building a Simple Closed LED Circuit
This core activity demonstrates how electrical current flows in a continuous loop from a power source through a load and back.
Materials Needed
-
One 3V button cell battery or 2xAA battery pack
-
One 5mm LED indicator
-
Two alligator clip jumper wires
Step-by-Step Instructions
-
Identify the LED Polarity: Look closely at the two metal legs of your LED. The longer leg is the positive anode, while the shorter leg is the negative cathode.
-
Attach the Positive Wire: Connect one end of the red alligator clip lead to the positive terminal of your battery holder. Clip the opposite end onto the longer leg of the LED.
-
Complete the Loop: Attach the black alligator clip lead to the negative terminal of the battery holder. Clip the other end onto the shorter leg of the LED.
-
Observe the Result: The LED lights up immediately.
-
Test an Open Circuit: Unclip one wire from the LED. The light goes out instantly because the pathway is broken, creating an open circuit.
Project 2: Demonstrating Series vs Parallel Circuits
Understanding how components connect in series versus parallel lays the groundwork for standard electrical literacy.
Materials Needed
-
One 3V or 4.5V battery pack
-
Two small light bulbs or LEDs with holders
-
Four insulated connecting cables
Step-by-Step Instructions for a Series Circuit
-
Connect the positive terminal of the battery pack to the first bulb holder terminal.
-
Connect a second wire from the remaining terminal of the first bulb holder to the first terminal of the second bulb holder.
-
Connect a third wire from the remaining terminal of the second bulb holder back to the negative battery terminal.
-
Observation: Both bulbs illuminate, but they appear dimmer than a single bulb circuit because voltage splits across both loads.
-
Break Test: Unscrew one bulb from its holder. The second bulb immediately goes out because the single shared path is severed.
Step-by-Step Instructions for a Parallel Circuit
-
Connect positive and negative leads from the battery holder to two parallel strip lines or junction points.
-
Connect each bulb holder independently across these two parallel supply lines.
-
Observation: Both bulbs shine brightly at full potential because each branch receives the complete supply voltage.
-
Break Test: Unscrew one bulb. The other bulb remains fully illuminated, demonstrating how independent electrical branches function in household wiring systems.
Project 3: Testing Conductors and Insulators
This activity helps students discover which household materials allow electrical current to pass through and which block its flow.
Materials Needed
-
Assembled LED circuit from Project 1
-
Test items: metal paperclip, wooden ruler, plastic spoon, copper coin, eraser, aluminium foil, graphite pencil lead
Step-by-Step Instructions
-
Create a Testing Gap: Disconnect one connection point in your Project 1 LED circuit so that two clip ends remain free and unattached.
-
Insert Test Objects: Touch both free clip ends onto opposite ends of a test object (for example, the metal paperclip).
-
Record Observations: If the LED lights up, the material is an electrical conductor. If the LED stays unlit, the material is an electrical insulator.
-
Compile a Results Table: Keep a record of each tested item to identify common material properties.
|
Tested Object |
Material Type |
LED Lights Up? |
Classification |
|
Metal Paperclip |
Steel / Iron |
Yes |
Conductor |
|
Plastic Spoon |
Polyethylene |
No |
Insulator |
|
Copper Coin |
Copper Alloy |
Yes |
Conductor |
|
Wooden Stick |
Cellulose / Wood |
No |
Insulator |
|
Aluminium Foil |
Aluminium Metal |
Yes |
Conductor |
|
Rubber Eraser |
Vulcanised Rubber |
No |
Insulator |
Project 4: Creating a Paper Circuit Greeting Card
Paper circuits combine craft, design, and practical electronics, making them a popular choice for young creators.
Materials Needed
-
Heavy craft cardstock paper
-
Adhesive conductive copper foil tape
-
3V CR2032 coin battery
-
3mm flat ultra-bright LED
-
Clear sticky tape
Step-by-Step Instructions
-
Draw the Circuit Path: Sketch two parallel lines on the paper card, leaving a 5mm gap for the LED and a small corner fold area for the coin battery.
-
Lay the Copper Tape: Peel and press conductive copper foil tape smoothly over your pencil lines. Ensure continuous metallic contact along each path.
-
Attach the LED: Place the LED across the 5mm gap, ensuring the long positive leg touches the positive tape path and the short negative leg touches the negative path. Secure the legs firmly with sticky tape.
-
Install the Battery: Place the CR2032 coin battery onto the bottom path. Fold the card corner over so the top copper track presses firmly against the top face of the battery.
-
Watch it Light Up: Pressing the corner completes the circuit, lighting up your custom greeting card art!
Project 5: Building a Simple Motorised Spinning Frame
This advanced project demonstrates how electrical energy converts into mechanical motion using small direct-current motors.
Materials Needed
-
Small 3V-6V hobby DC motor
-
2xAA battery holder with integrated switch
-
Cardboard disc or lightweight plastic spinning wheel
-
Double-sided foam tape
Step-by-Step Instructions
-
Prepare the Rotational Mount: Press a circular cardboard wheel securely onto the central shaft of the DC motor.
-
Decorate the Disc: Draw colourful spiral patterns on the cardboard wheel so motion creates visual illusions.
-
Connect Power Wires: Attach the red and black wires from your battery pack directly to the two rear electrical tabs of the DC motor.
-
Mount the Motor Securely: Anchor the motor base onto a heavy wooden block or table edge using double-sided foam tape.
-
Engage the Power: Turn on the battery pack switch. Electrical current flows through the internal motor coils, generating a magnetic field that spins the disc rapidly.
Also Check - PW Science Kit for School Projects
Safety Rules for Electricity Experiments at Home
Safety must always come first when working with any electrical component. Although home projects use low-voltage direct current (DC) sources, teaching correct safety habits from the beginning builds responsible scientific habits.
-
Use Low-Voltage Batteries Only: Never use wall outlets, mains power supplies, or heavy lead-acid batteries. Stick exclusively to standard AA, AAA, or 9V dry-cell batteries, or child-friendly kit battery packs.
-
Avoid Water near Electrical Setups: Keep liquids, wet towels, and damp hands completely clear of the work area to prevent short circuits and component corrosion.
-
Inspect Components Before Use: Check insulated wires for bare exposed copper patches and ensure battery casings are non-leaking and undamaged.
-
Disconnect When Unattended: Always disconnect the battery pack after completing an experiment or when stepping away from the workspace.
-
Supervise Young Learners: Adult supervision ensures children follow instructions precisely and handle tools like wire strippers or scissors safely.
|
Safety Aspect |
Safe Practice |
Unsafe Practice |
|
Power Source |
AA / AAA / 9V Dry-Cell Batteries |
Wall sockets, extension cords, mains power |
|
Environment |
Clean, dry wooden or plastic table |
Sink counters, damp outdoor tables, wet trays |
|
Wiring |
Insulated copper cables, alligator clips |
Bare uninsulated wire touches, frayed cords |
|
Handling |
Dry hands, careful component placement |
Wet hands, forcing tight connections with pliers |
How to Choose a Kit for Electricity Experiments at Home?
While sourcing loose components works well for single projects, purchasing a curated educational kit saves time, ensures component compatibility, and provides structured learning materials.
-
Age Appropriateness: Choose kits specifically structured for your child's age group. For children aged 8 to 12 years, look for solderless designs with clear step-by-step visual guides.
-
Variety of Activities: Select kits offering multiple projects—such as interactive learning cards, motor crafts, and paper circuits—to sustain long-term interest.
-
Safety Certifications: Ensure components are made from child-safe, non-toxic materials with insulated connections and low-voltage power supplies.
-
Instructional Clarity: High-quality kits feature colourful, step-by-step guidebooks that allow students to experiment independently without constant adult intervention.
The Electric Science Kit stands out as a practical solution designed for home learning. Containing over 20 interactive activities—including Halloween decorations, spinning frames, and custom greeting cards—it provides all necessary safe materials alongside easy-to-follow visual instructions. It offers an ideal entry point for children to master electricity experiments without complex tool requirements.
How to Fix Problems in Electricity Experiments at Home?
When an experiment does not work as expected, use this systematic troubleshooting guide to identify and fix the issue quickly:
-
Check Battery Orientation: Ensure positive (+) and negative (-) terminals match the component requirements, especially for LEDs which only pass current in one direction.
-
Verify Tight Connections: Loose alligator clips or broken copper tape traces disrupt current flow. Re-press all contact points firmly.
-
Test Power Levels: Batteries deplete quickly during motor experiments. Replace older dry cells with fresh batteries if light bulbs dim or motors slow down.
-
Inspect for Short Circuits: Ensure positive and negative wires do not touch each other directly before reaching the load component. Short circuits drain power rapidly and cause wires to warm up.
Read More: 21 Educational STEM Projects Activities
Electricity Experiments FAQs
Are electricity experiments safe for young primary school children?
Yes, when conducted using low-voltage dry-cell batteries (such as AA, AAA, or 3V coin cells), these activities are safe for young learners. Always ensure children work away from water sources and never use mains electrical sockets. Adult supervision is recommended for younger age groups.
What basic materials are needed to start electricity experiments for kids?
To start basic activities, you need a low-voltage battery holder, jumper cables with alligator clips, small 3V LEDs or light bulbs, a simple slide switch, and common household items like paperclips, aluminium foil, and craft cardstock.
Why does an LED fail to light up in a simple circuit setup?
LEDs are light-emitting diodes that only allow electrical current to flow in one direction. If an LED fails to light, try reversing its connections. Ensure the longer positive pin connects to the positive battery terminal and check that all wire clips are securely attached.
How do simple electricity experiments help children learn STEM concepts?
Hands-on activities transform theoretical physics into tangible experiences. Children visually observe how electrical currents move, learn to systematically troubleshoot broken connections, and understand the practical difference between series and parallel configurations through direct experimentation.
What is the advantage of using a dedicated science kit like the Electric Science Kit?
Dedicated kits provide pre-tested, child-safe components alongside structured, step-by-step project guides. This eliminates component mismatch issues, provides over 20 engaging activities, and allows students to learn fundamental electronics independently and safely at home.